Saturday 21 June 2014

Simple FM Receiver


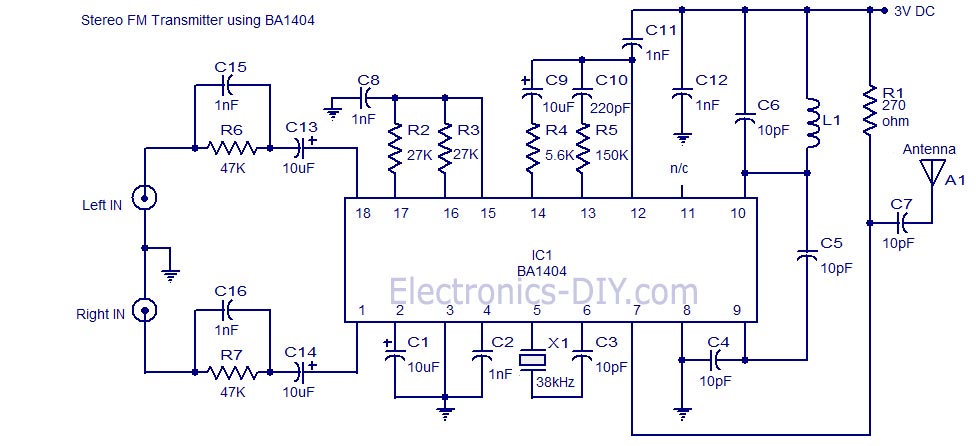
Frequency modulation is used in radio broadcast in the 88-108MHz VHF band. This bandwidth range is marked as FM on the band scales of radio receivers, and the devices that are able to receive such signals are called FM receivers. The FM radio transmitter has a 200kHz wide channel. The maximum audio frequency transmitted in FM is 15 kHz as compared to 4.5 kHz in AM. This allows much larger range of frequencies to be transferred in FM and thus the quality of FM transmission is significantly higher than of AM transmission.


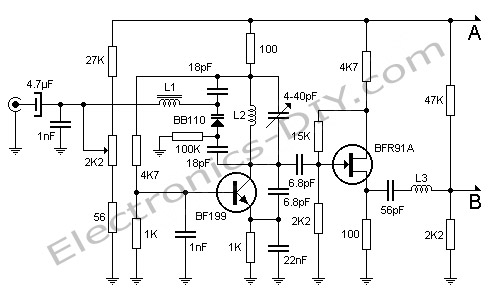
Here’s a simple FM receiver with minimum components for local FM reception. Transistor BF495 (T2), together with a 10k resistor (R1), coil L, 22pF variable capacitor (VC), and internal capacitances of transistor BF494 (T1), comprises the Colpitts oscillator. The resonance frequency of this oscillator is set by trimmer VC to the frequency of the transmitting station that we wish to listen. That is, it has to be tuned between 88 and 108 MHz. The information signal used in the transmitter to perform the modulation is extracted on resistor R1 and fed to the audio amplifier over a 220nF coupling capacitor (C1).

You should be able to change the capacitance of the variable capacitor from a couple of picofarads to about 20 pF. So, a 22pF trimmer is a good choice to be used as VC in the circuit. It is readily available in the market. If you are using some other capacitor that has a larger capacitance and are unable to receive the full FM bandwidth (88-108 MHz), try changing the value of VC. Its capacitance is to be determined experimentally.

The self-supporting coil L has four turns of 22 SWG enamelled copper wire, with air core having 4mm internal diameter. It can be constructed on any cylindrical object, such as pencil or pen, having a diameter of 4 mm. When the required number of turns of the coil has reached, the coil is taken off the cylinder and stretched a little so that the turns don’t touch each other.

Capacitors C3 (100nF) and C10 (100µF, 25V), together with R3 (1k), comprise a band-pass filter for very low frequencies, which is used to separate the low-frequency signal from the high-frequency signal in the receiver.You can use the telescopic antenna of any unused device. A good reception can also be obtained with a piece of isolated copper wire about 60 cm long. The optimum length of copper wire can be found experimentally.

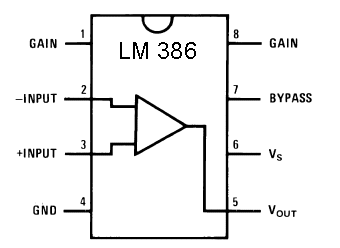
The performance of this tiny receiver depends on several factors such as quality and turns of coil L, aerial type, and distance from FM transmitter. IC LM386 is an audio power amplifier designed for use in low-voltage consumer applications. It provides 1 to 2 watts, which is enough to drive any small-size speaker. The 22k volume control (VR) is a logarithmic potentiometer that is connected to pin 3 and the amplified output is obtained at pin 5 of IC LM386. The receiver can be operated off a 6V-9V battery.

Crystal AM Transmitter


Here is the circuit of a medium-power AM transmitter that delivers 100-150 mW of radio frequency (RF) power. At the heart of the circuit is a crystal oscillator. A 10MHz crystal is used to generate highly stable carrier frequency. Audio signal from the condenser mic is amplified by the amplifier built around transistors T1, T2 and T3. The amplified audio signal modulates the RF carrier generated by the crystal oscillator built around transistor T4. Here modulation is done via the power supply line. The amplitude-modulated (AM) signal is obtained at the collector of oscillator transistor T4.


Fig. 1: Circuit of crystal AM transmitter


Fig. 2: Oscillator coil


Fig. 3: Modulation transformer

By using matching dipole antenna and co-axial cable, the range of signal transmission can be increased. For maximum range, use a sensitive radio with external wire antenna. The circuit works off a 9V-12V battery. For oscillator coil L1, wind 14 turns of 30SWG wire round an 8mm diameter radio oscillator coil former with a ferrite bead (see Fig. 2). For modulation transformer X1, you can use the audio output transformer of your old transistor radio set. Alternatively, you can make it from E/I section transformer lamination with inner winding having 40 turns of 26SWG wire and the outer winding having 200 turns of 30SWG as shown in Fig 3.

Low-Range AM Radio Transmitter


Here is a simple radio transmitter for transmission up to 25 metres. It is basically an AM modulator whose signal can be received on the normal AM radio. It can also be used as an AM radio tester.IC 555 (IC1) is used as a free running multivibrator whose frequency is set above 540 kHz. Here the circuit is designed for a frequency of around 600 kHz. The frequency of the multivibrator can be calculated as follows:
f=1.443(R1+2R2)C1

where resistors R1 and R2 are in ohms, capacitor C1 is in microfarads, and frequency f is in hertz. This frequency can be changed by simply replacing R2 with a variable resistor or C1 with gang capacitors. But it may increase the complexity of the circuit. A condenser microphone is used for speaking.

The IC 555 multivibrator is used as a voltage-to-frequency converter. The output of the condenser microphone is given to pin 5 of IC1, which converts the input voltage or voice signal into its appropriate frequency at output pin 3. This frequency produces an electromagnetic wave, which can be detected by a nearby radio receiver, and you can hear your own voice in that radio. Note that the receiver should be AM type. If there is no noise in receiver, tune it to 600 kHz.The circuit operates off a 9V regulated power supply or a 9V battery. For antenna, connect 2-3m long wire at pin 3.

CRYSTAL AM TRANSMITTER


The LM386 is a common integrated circuit that acts as an audio amplifier.  These little things can actually make some pretty big sound.  I've used them in a few projects, like my Arduino doorbell.

lm386 pins
Pin diagram for the LM386 IC

The most important pins are 3 (your audio input), 6 (your voltage input), and 5 (your audio output).  Pins 2 and 4 go to ground.  A capacitor between 1 and 8 will increase your audio gain (a.k.a. louder volume).  Pin 7 with a capacitor can be used to clean up the audio output.  Checkout the datasheet for more information.

The transmitter circuit feeds the signal output of the LM386 into the crystal oscillator to modulate the RF signal.  A few capacitors and a resistor are added to the LM386 as per its datasheet specs and to clean up the audio signal.
lm386 crystal oscillator am transmitter
If you don't have all the parts for the lm386 portion of the circuit, don't worry.  The only part here that really matters is the capacitor on pin 3, which helps increase the audio quality.  The capacitor and resistor on pin 5 don't seem to make much of a difference, but I left them in because they are part of the standard lm386 build out from the data sheet.  The capacitor on pin 6 where the voltage is input, smooths power fluctuations, but with a 9v battery input you don't need to worry about this too much.

After you power up your circuit and plug it into an audio source (like your phone), tune your radio to 1000 kHz and take a listen.  If all went well you should hear music playing, and it should sound a lot better than the circuit in part 2.  If the audio is distorted, try lowering the input volume on your phone / mp3 player.  The distortion is overmodulation.

LONG RANGE SHORT WAVE TRANSMITTER


This transmitter circuit operates in shortwave HF band (6 MHz to15 MHz), and can be used for shortrange communication and for educational purposes.

The circuit consists of a mic amplifier, a variable frequency oscillator, and modulation amplifier stages. Transistor T1 (BF195) is used as a simple RF oscillator. Resistors R6 and R7 determine base bias, while resistor R9 is used for stability. Feedback is provided by 150pF capacitor C11 to sustain oscillations. The primary of shortwave oscillator coil and variable condenser VC1 (365pF, 1/2J gang) form the frequency determining network.

By varying the coil inductance or the  capacitance of gang condenser, the frequency of oscillation can be changed. The carrier RF signal from the oscillator is inductively coupled through the secondary of transformer X1 to the next RF amplifier-cum-modulation stage built around transistor T2 that is operated in class ‘A’ mode. Audio signal from the audio amplifier built around IC BEL1895 is coupled to the emitter of transistor 2N2222 (T2) for RF modulation.

IC BEL1895 is a monolithic audio power amplifier designed for sensitive AM radio applications. It can deliver 1W power to 4 ohms at 9V power supply, with low distortion and noise characteristics. Sincen the amplifier’s voltage gain is of the order of 600, the signal from condenser mic can be directly connected to its input without any amplification.

The transmitter’s stability is governed by the quality of the tuned circuit components as well as the degree of regulation of the supply voltage. A 9V regulated power supply is required. RF output to the aerial contains harmonics, because transistor T2 doesn’t have tuned coil in its collector circuit. However, for short-range communication, this does not create any problem.The harmonic content of the output may be reduced by means of a high-Q L-C filter or resonant L-C traps tuned to each of the prominent harmonics. The power output of this transmitter is about 100 milliwatts.

Shortwave Transmitter

The following schematic shows the three stages of our circuit.  If you came across this article without reading my previous posts, and think this circuit looks difficult to build, it's not.  Each stage is simple enough for novices to build, and the circuit is interesting enough for RF electronics experimenters to learn something.  Hard to find parts can be found as usual by my recommendations here.  Novices should try to build each stage of the circuit separately and ensure each works before putting it all together.  The links provided for each stage cover in detail how each stage is built and how it works.

first stage is the audio modulator built from an LM386 IC with minimal parts.  The modulated audio is fed into the second stage of the circuit which is the transmitter, configured for frequencies around 40 meters.  The output of the second stage could be fed directly into an antenna or dummy load, but instead we will feed it into a third stage, a low pass filter, to filter out harmonics generated by the transmitter.  The filter will ensure our signal only is present on the broadcast frequency, in this case 6925 kHz, a popular shortwave pirate frequency.

simple pirate shortwave transmitter schematic 6925 kHz
I recommend soldering this circuit up using perf board or using dead bug construction.  Breadboard prototyping doesn't always work well for RF circuits, as they can add extra capacitance into the circuit.  I was not able to get the low pass filter working properly until I soldered it up.  The transmitter and audio modulator do seem to work on a breadboard, so your mileage may vary.

Here's a picture of the completed transmitter stage connected to the audio modulator on a breadboard.  The transmitter is fed into a dummy load instead of the low pass filter, as I didn't want my signal to travel.  The audio input is just a monaural headphones jack that can be plugged into a phone, mp3 player, or anything else with a headphones jack.

prototype shortwave pirate transmitter

Stereo FM Transmitter with BA1404


Stereo FM Transmitter with BA1404

A high quality stereo FM transmitter circuit is shown here. The circuit is based on the IC BA1404 from ROHM Semiconductors. BA1404 is a monolithic FM stereo modulator that has built in stereo modulator, FM modulator and RF amplifier. The FM modulator can be operated from 76 to 108MHz and power supply for the circuit can be anything between 1.25 to 3 volts. In the circuit R7, C16, C14 and R6, C15, C13 forms the pre-emphasis network for the right and left channels respectively. This is done for matching the frequency response of the FM transmitter with the FM receiver. Inductor L1 and capacitor C5 is used to set the oscillator frequency. Network C9,C10, R4,R5 improves the channel separation. 38kHz crystal X1 is connected between pins 5 and 6 of the IC. Composite stereo signal is created by the stereo modulator circuit using the 38kHz quartz controlled frequency.

4 Transistor FM Transmitter


4 Transistor FM Transmitter

This circuit provides an FM modulated signal with an output power of around 500mW. The input microphone pre-amp is built around a couple of 2N3904 transistors (Q1/Q2), and audio gain is limited by the 5k preset trim potentiometer. The oscillator is a colpitt stage, frequency of oscillation governed by the tank circuit made from two 5pF ceramic capacitors and the L2 inductor. The output stage operates as a 'Class D' amplifier, no direct bias is applied but the RF signal developed across the 3.9uH inductor is sufficient to drive this stage. The emitter resistor and 1k base resistor prevent instability and thermal runaway in this stage.

18W FM Transmitter


18W FM Transmitter

Here's FM transmitter for commercial FM band that provides 18 watts of power. Since the electronic diagram is too large we decided to divide it into two parts. The first part is the actual FM transmitter while the second part is 18W RF amplifier. The circuit should be built on an epoxy printed circuit board with the upper face components reserved for interconnecting tracks and the bottom solder to the ground plane. If powered by 14V and 2.5A transmitter outputs 15W of power, whereas 18V and 3.5A will provide 18W. BB110 variable capacitor connected to the collector of transistor BF199 adjusts the transmission frequency of the circuit. 2K2 potentiometer serves as fine tuning. Once the output frequency is adjusted amplifier variable capacitors must be adjusted for maximum output power one stage at a time. All adjustments must be made with 50 Ohm dummy load connected to the output of transmitter.